# Unity Mobile XR SDK
# Introduction
Pimax Unity XR SDK is an all-in-one development kit for Unity developers. It provides a series of XR functions including rendering, input, tracking, etc. Using this SDK, you can easily build the XR application running on the Pimax all-in-one devices.
# Quick Start
# Overview
This guide introduces how to build a simple scene based on the Unity XR and build an XR application that can run on the Pimax VR all-in-one devices.
For novice developers, it is recommended to browse Unity XR document (opens new window) Get the necessary basic knowledge, then read the various parts of this guide in order, develop your first XR application step by step.
If you are an experienced developer, you can also browse a part of it alone for reference.
This guide includes the following parts:
- Setup development environment
- Import Pimax Unity XR SDK
- Custom settings
- Build XR scenes
- Build application
# Pimax Platform SDK
If you want to publish your game to the Pimax store, you need to integrate the Pimax Platform SDK.
You can get the latest platform SDK Download Page, and then refer to the Platform SDK document to integrate it into the game.
# Setup Development Environment
This part introduce what you need to do before starting with PimaxXR application development, including software and hardware requirements, installation and settings, etc.
# Hardware Requirements
- Pimax Crystal/Pimax Portal
# Software requirements
- Windows/Mac operating system (recommended 64 -bit)
- Unity Editor 2019.3 or higher
# Install Unity editor
Pimax Unity XR SDK support Unity editor 2019.4 LTS or later. We recommend using 2020.3LTS or higher versions.
Here is a quick introduction to the Unity installation steps. For more details, please refer to Unity Installation Document (opens new window).
- Download and install Unity Hub.
- Switch to the "Install" tab, click "Install Editor".
- Select the editor version you need, click to install.
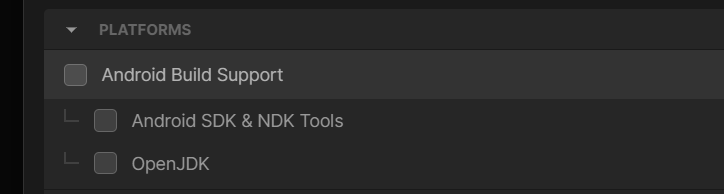
- In order to build an Android application, Android Build Support module are required, make sure SDK, NDK, JDK are checked. In the "PLATFORM" part of the "Add Module" window, check the Android Build Support, Android SDK & NDK Tools and OpenJDK.
- Click the Install button, wait for the installation to complete.
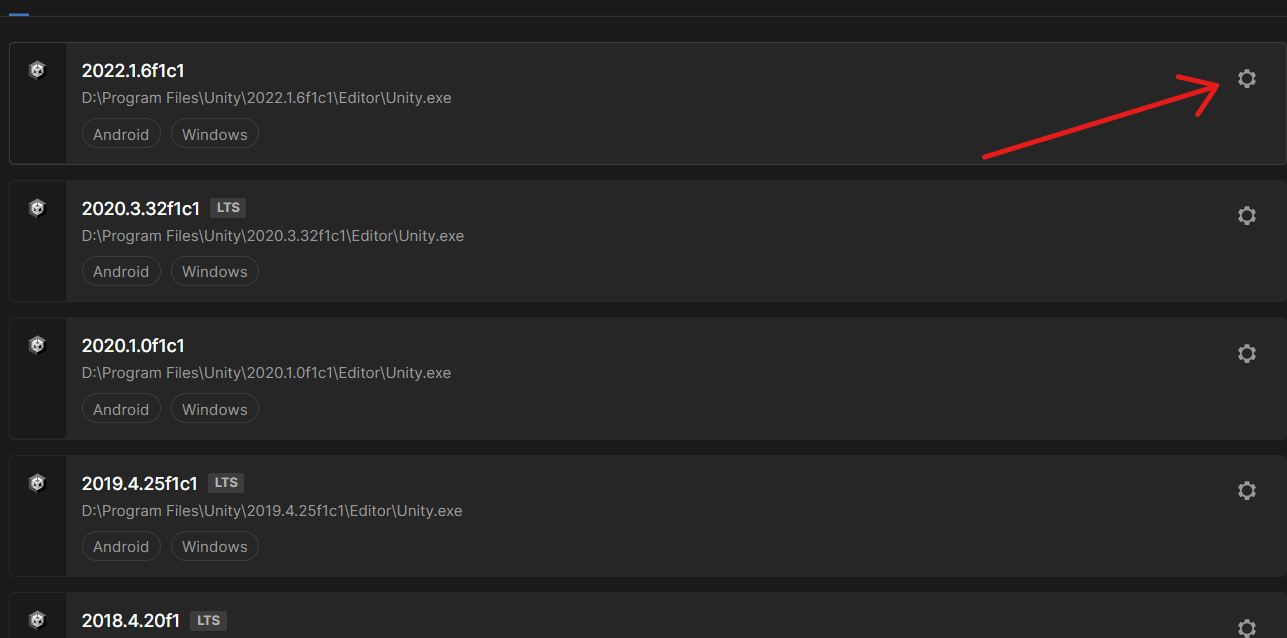
If you have installed Unity but not installed Android Build Support modules, you can add this module to Unity Hub at any time, select the Unity version you want to add in the "Installation" tab, click the gear icon next to it, and then click "Add the module to add the module ", Check the Android Build Support, Android SDK & NDK Tools and OpenJDK, click Install.
# New Project
- Open Unity Hub.
- In the "Project" tab, click "New Project" to select the editor version you want to use.
- Select the "3D core" template, enter the project name and path, and click "Create Project".
# Android Development Environment Setup
To get started, you will need a usb cable to connect the headset to PC and use adb to communicate with the device. You can find more details from Android Developer Site (opens new window).
# Import Pimax Unity XR SDK
Pimax Unity XR SDK is a standard UPM package. About UPM, you can refer to Unity's Package Manager (opens new window) .
By doing as follow steps, you can import the Pimax Unity XR SDK package into your project:
Get the latest Pimax Unity XR SDK at the Download Page.
Open the Unity project you want to import Pimax Unity XR SDK, click the "Window"-"Package Manager" in the top toolbar to open the Unity package manager.
Click the "plus" icon in the upper left corner of the package manager, and select "Add a package from the disk".
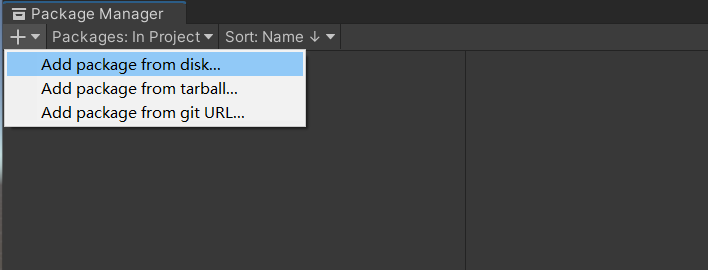
Select the package.json file in the Pimax Unity XR SDK package folder at the pop -up dialog box.
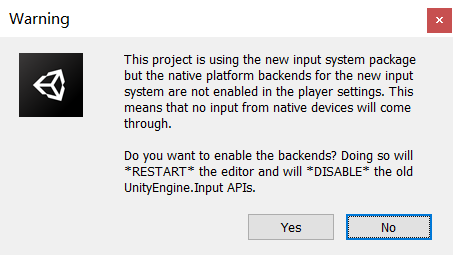
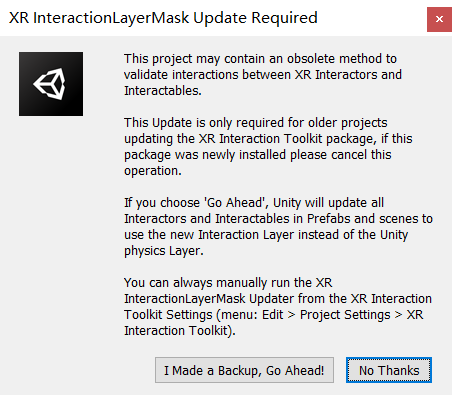
Select No, No thanks in the popup dialog box.
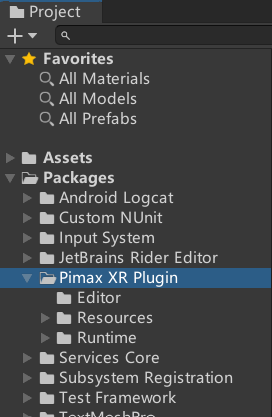
After completion, you can close the Package Manager window, then you can find the SDK package under the Package path of the "Project" window.
# Custom Settings
# Setting Target Platform
Before other settings, be sure to switch the Unity project to the correct target platform.
To develop applications for the Pimax all-in-one devices, you need to set the target platform to Android. The final program package will include APK files and APK expansion files (OBB) (if it has been enabled).
Click "File"-"Build Settings" on the top toolbar.
Select "Android" on the "Platform" column.
Click the "Switch Platform" in the lower right corner.
# Enable XR
In order to support the application XR function, the XR module of Unity needs to be enabled and selects the corresponding plug-in for the headset you want to running with.
Click "Edit"-"Project Settings" on the top toolbar.
In the "Project Settings" window, select the "XR Plug-in Management" tab.
Check PimaxXR.
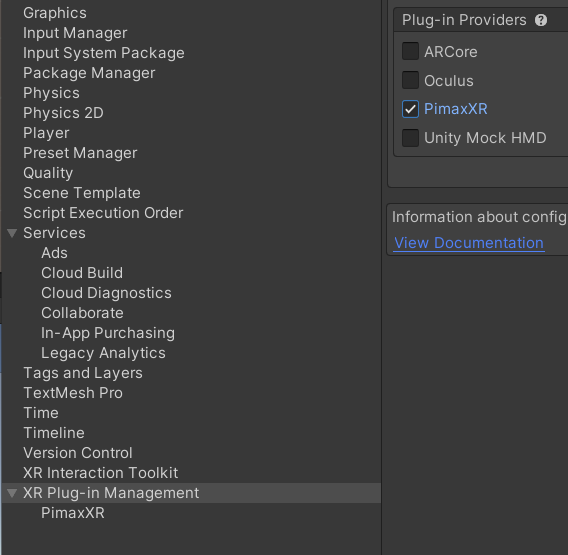
Switch to the "PimaxXR" tab under the "XR Plug-in Management" tab. This contains some important global XR settings, which can be checked as needed.
# Player Settings
- Open the "Player" tab in "Project Settings".
- Modify the "Company Name" and "Product Name" above the window. The information here is shared by multi-platform, usually displayed in the title bar of the application window and for Android application names.
- Modify the "Version" to ensure that the version number is larger than the previous time
# Graphics API Settings
Open the "Other Settings" section in the Android platform tab below and uncheck "Auto Graphics API".
Select another option in the "Graphics APIs" list and click the minus button in the lower right corner to delete it.
Only keep "OpenGLES3".
Make sure the color space is "Gamma".

# Android Settings
Each Android application must include Androidmanifest.xml files, which contains important information required for application operation, including permissions, software and hardware support, metadata, Android version support, etc.
Android uses a package name to identify the application. Each application has a unique package name. Once the application is published, please try to avoid any changes to the package name.
Open the "Other Settings" part in the Android Platform tab below, find "Identification", check whether there is "Override Default Package Name" option
If there is "Override Default Package Name" and you leave it unchecked, Unity will generate the default package name according to the "com.${Company Name}.${ Product Name}".
If there is no "Override Default Package Name" option, or if you choose to check this item, you need to specify the package name manually. Generally, we also recommend you using the "com.${Company Name}.${ Product Name}" method specify the package name.
In "Identification", set the "minimum API level" to "Android 8.0 'Oreo' (API level 26)". "Target API level" to "Automatic (Highest Installed)".

By default, the Unity engine will automatically generate AndroidManifest.xml files and pack it into the APK. If you need to customize the Androidmanifest.xml file, add
<meta-data android:name="com.pimax.vr.application.mode" android:value="vr" />
tag.

# Build XR Scene
This part will guide you build your first XR scene, including the basic camera and controller.
# Add XR Origin
Click the plus icon in the upper left corner of the "Hierarchy" window, select "XR"-"Device-Based"-"XR Origin". Add XR Origin to the current scene

XR Origin hierarchical structure is as follows

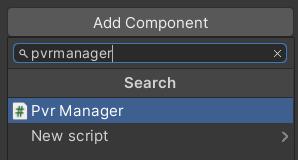
Select XR Origin, click the Add Component button at the bottom of the inspector window
Search PvrManager script and double-click to add, PVRManager script control part of the SDK function switch and settings.
# Add the Controller Model
The SDK contains the 3D model of the Pimax controller. You can also add your own unique models, such as a staff, bow, arrow, and firearm, etc. thereby cooperating with the game style.
Select the lefthand controller contained in XR Origin, and find the XR Controller (Device-Based) component in Inspector.
In the Project window Package-Pimax XR Plugin-Resources-Prefab path, find the Prefab named Auto_controller_left, drag it into the Model Prefab property of the XR Controller component found in the first step.
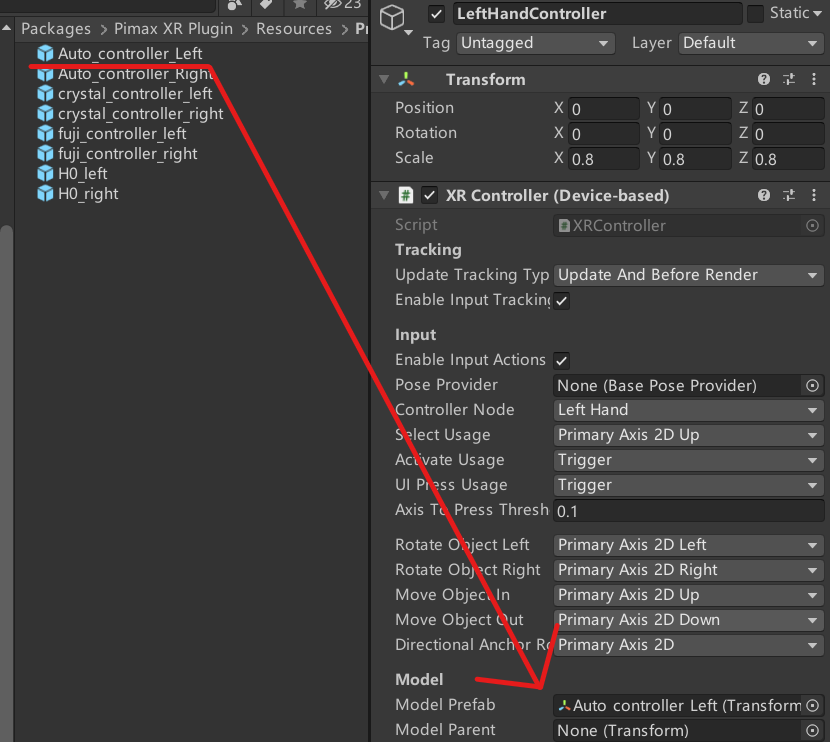
Take same operation for Righthand Controller, this time the use of prefab named Auto_controller_right.
# Build And Debug Your App
Compile the XR scene and pack it into the APK file, install it on the Pimax all-in-one and run it.
- Use USB cable to connect the headset and PC.
- Click File-Build Settings in the toolbar above.
- In the Build Settings window, click the Add Open Scene button to add the currently opened scene to the scene list.
- The #0 scene in the scene list is the default scene when launch the game.
- Set Run Device to the current connected device.
- Click Build and Run.
- Select the storage location of the APK in the pop-up dialog box.
# Input
This part of the document describes how to use the Pimax controller in XR applications, including tracking, joystick, buttons and other functions.
You can get the controller state by using the Unity XR Input system, or the Unity XR Interaction Toolkit.
# Unity XR Input
Unity XR Input provides a cross-platform input scheme, you can refer XR Input (opens new window) for more information.
Pimax controller button mapping:
| key press | input event |
|---|---|
| Menu | CommonUsages.menuButton |
| Trigger | CommonUsages.TriggerButton |
| Grip | CommonUsages.GripButton |
| Joystick Press | CommonUsages.primary2DAxisClick |
| X/A | CommonUsages.primaryButton |
| Y/B | CommonUsages.secondaryButton |
| Axes | Input Events |
|---|---|
| Trigger | CommonUsages.Trigger |
| Grip | CommonUsages.Grip |
| Joystick | CommonUsages.primary2DAxis |
# Unity XR Interaction Toolkit
Unity XR Interaction Toolkit is an advanced component-based interaction system that you can use to easily create various interactions
You can refer Unity XR Interaction Toolkit (opens new window) for more information
# Explorer More
The SDK includes more features not covered in this guide, You can learn more with code and examples to see how these features are used.